Friday, June 10, 2011

Johnny's ocean painting

Hello,


Well, Joel and Victoria loved their painting. It's awesome when I pull it off, you just never know what somebody is going to like or dislike. As an artist, you have to go with the flow and give the people that hire you the final word, after all, it is their painting.


So, here we go again. A friend of mine was looking at my website and noticed a painting he really liked. He came over and we started talking about the painting he saw, he was talking about a little painting I did a few months a go. I ended up with this little painting from a gargage sale. It had this awful painting on it, so I sanded it down and did a whole new painting on top of it. The painting I did was a black and white ocean in the middle of night with a moon and stars. The painting was really small, so Johnny asked if I could do another one but this time make it 4ft long and close to 3ft tall. It's a cool painting, it's kind of like you're floating in the ocean and you can see the moon and stars above you.


After priming the canvas, I stopped and thought, I sure would like to have some motion in the water. Hmmm, I wander how I can create that some movement, after thinking about it I remembered that I had some dry paint in a tray. I'm bad about using a roller tray for a paint board, so there was a bunch of diffferent color paint in a tray that was all dry. I filled it up with water and let it set for a few days. After the paint sets in the water for so long it starts to seperate from the tray. So, I had this huge sheet of dry paint here's a pic

What I did was cut the sheet into little strips of paint like this

Then I glued the pieces on to the canvas, I didn't want to see the straight lines where I cut the paint with the siccors, so I used a special concocktion I came up with to cover over those lines. This is what it looks like


After all the texture dried I started painting the water a black color mixed with a cery dark blue color. Plus, I wanted to create a one of a kind night color, I mixed a metalic blue and some flat black, this gives the night color this special kind of shine that black alone can't give you.

                                                                      
I continued to add the black and dark blue color to the water trying to leave the areas where I'm going to add the white color (reflextion from the moon), alone.

Added the texture below the water really turned this painting into a piece of art, instead of it just being a flat looking painting. When you look at the lower left corner of the painting where the reflextion stops, it looks like the water is still moving. Like this

                                                                       
Now, the moon is a whole another story, and, you only have so many chances to get it right or you have to start all over because the paint builds up all around the circle of the moon and it looks fake at that point. Let me tell you, there's nothing easy about creating a moon, believe me, its not that easy. It's always hard when try to paint something the good lord created lol. So here's the finished painting, I'll put a better pic it on here next week.


Thanks for hiring to do this painting for you Johhny, I hope you like it as much as I do.
                                                                         

Thursday, June 2, 2011

Joel and Victoria's painting

So hear we go again, the last painting was a lot of fun, but it's time to move on to the next one.

Some friends from work, Joel & Victoria, bought a house recently and started fixing it up. It sounds like a really cool house. They wanted a new painting for their new house and they came to the right person lol. After talking to Joel, I could tell he really liked some of my stained glass paintings. I call it that style because everybody said they look like stained glass windows. I love to paint these kinds of paintings because I have so much freedom to be creative, I can mix all kinds of different colors together, with all kinds of different shapes, it's just a lot of fun . On this painting I had a hard time coming up with the right drawing. I did probable 12 to 14 drawings trying to find the one I wanted to use for the painting. When Joel came over to discuss the painting, I showed him some of the other stained glass paintings I've done and he really liked the painting I did for the Ackley family. Their painting had a big A in the painting and Joel said “I like that, maybe we could put an I in my painting because my daughters name starts with an I. After thinking about their painting for awhile and doing some drawings, I asked Joel if we could put a big C for their last name instead of a I for her daughters name ( I wanted the painting to be a family painting instead of it being mostly about their daughter), he said sure. But, he said "can we put a letter for each member of the family, say, in each corner of the painting? So, I needed to put a big C somewhere close to the middle for their last name, and, J, V, I, T in each of the corners. That's another reason it took me so long to come up with the right drawing. I didn't want to put the C right in the middle where it sticks out like a sore thumb or punch's you right in the face when you look at the painting. I wanted it to be in there, but you couldn't really see it unless you were really looking. Plus, it looked kind of cheesy with the C right in the middle, like some bad tattoo or something. It's hard to explain, but I wanted the painting to have some class and eloquence. So, after finally coming up with the right drawing I went to work. After working on it for a couple of nights, I could tell it was, what I call, getting too busy. There was way too much stuff going on. I had to go back and take a bunch of stuff out by sanding certain parts out and using a bunch of white to wash out certain parts of it. Another problem was, the letters in the corners, I wanted them to look just right, but not have that stenciled look or something that was created on a computer. Plus I wanted them to have my famous swirl pattern on them too. So it took me awhile to come up with each letter. You know I had to think about this painting, remember, this is a family painting, and, will probable be passed down over generations, so I have to really pay attention to the details. Anyway, so here are some pics of some other 'Stained Glass' paintings I've done and the pics of the new painting at the end. Thanks for taking the time to read this blog, I hope you enjoy it.


Well, I got a lot more work done last night while my boys were enjoying the new pool lol. I've already talked about what I call 'ragging' which means applying the paint with a rag instead of a brush. After I get everything done to a certain point with a paint brush, that's when I start ragging. The ragging lets me create a feel, a warmth that a brush just can't do. It gives the shape depth and creates a whole new feeling to each color block. If you notice from pic to pic, I'm constantly changing the colors of each block, don't know how to explain this because it's just something I see or don't see. In my brain there has to be a certain combination of colors that are pleasing to my eye (And hopefully to other peoples too) and the only way is to keep changing the colors until I see what I want to see out of the painting. I can tell you this, this has not been an easy painting, but this is my 6th or 7th painting I've done in this style, so I know a lot of short cuts and secrets now. I use to always want to make the painting pretty the whole time I was doing one, by constantly redoing the black, but all that does is waste a bunch of black. This style of painting is like a bunch of my other styles, meaning, they don't look good until the very end. I'll frame the painting tonight, which should be fun, NOT, making a frame this size is pretty much a pain in the ass, to be quite frank. Plus, I want to make this frame like the Torq Lite painting frame, where the sides are 2" wide. I have a feeling I'll be working tell 2 or 3 in the morning tonight to get everything just about done. Here's a pic showing what I got done last night. We'll see what it looks like after the weekend. Talking about the weekend, I hope everyone has a good one. Seeya Monday, late Clint 


Hello, I got 98% of the painting done over the weekend, I just have to do a few touch ups and it'll be 100% finished. I told Joel I have it finished by tomorrow so I worked on it pretty much all Sunday. It was so hot yesterday; I had no interest in going outside anyway lol. I had a hard time with the letters in the corner, just couldn't get them right, but eventually I got it. This is the second time this blog has really helped me, Joel was looking at the pics and wanted to make sure I added a lot more grays and blues. I had a few too many greens and browns for him, so I'm really glad I got his feed back. I think painting came out great, I took a bunch of pics through out the weekend with my good camera but for some dumb reason I got a pic of the finished painting on my cell, so it's not that great. I put that pic at the very end; I had to doctor it up a bit. I'll take a bunch of good pics tonight and load them on here tomorrow. I also remembered over the weekend that I did show my best work in this style, I did a 63ft long painting at a restaurant last year in this style and made a video of it, so I'm loading that on here too.


Well, at one point last night, I thought there is no way I’m going to have this painting done by tomorrow morning. I was having a hard time painting the sides of the frame, the front of the painting has a black outline holding everything together, but the sides are a dark gray color. I didn’t want to tape it off and have it in exact line dividing the gray and black color; I wanted to do by hand so it has a few flaws in it. One thing about me, I hate perfect computer generated looking stuff. Plus, I had to do the ( I ) in the lower right corner all over again, the ( I ) was too big and didn’t look right. This was kind of an interesting painting; in that, Victoria wanted browns, greens and red colors and Joel wanted gray and blue colors, so finding the right combo of colors was interesting to say the least. In the end, I think I gave both of them what they were looking for. I got to say, I didn’t think this painting was going to take this long, I figured I had done a bunch of paintings in this style, so it wouldn’t take me long, but it took a little longer than I thought. I think it came out really beautiful, I’m really happy with the color combination. I can only imagine how beautiful it’ll be in their new house. Here’s the pics to show the finished painting. I want to thank Joel and Victoria for hiring me to do this painting for them. I hope it gets passed down to their daughter and so on and so on and always stays in the family. I’m going to take a few days off before I start the next one; a friend wants me to do a painting for him. We’ll go over it on the next blog. Thanks for taking the time to read this.


Clint B. Meadors
C Meadors Art
Clint.meadors@yahoo.com

Monday, May 9, 2011

Shelley's mom painting

Hello,

It's been awhile since my last post. I wanted to thank everybody for the nice emails, I'm glad you like the blog. Sorry, it's taking so long to write again, but I needed a little break.


I wanted to talk about my alien faces paintings a little bit. I guess it was  about 2 years a go, I was messing around and decided to paint something just for me. I wanted to paint something fun and kind of crazy. After thinking about it for awhile I ended up painting some alien looking dudes, but I didn't want them to be scary looking. I wanted them to be very happy and friendly, so I added some human features on the faces, like their eyes, mouth, teeth. I also wanted them to look like their having fun, where they're all hanging out laughing about whatever. I did my first one and didn't show it to anybody, but my ex came over to pick my boys up one weekend and noticed it. She said " What's that, wow, it's cool, I didn't know what she was talking about until I looked dwon at the alien painting. I said, you really like it? Yeah, it's funny and really cool. I eneded up giving her the painting for Christmas. I also took a pic of it and had it on my computer at work, a couple of months went by and I was showing a friend at work the first tree painting I did, but in the process of showing him the tree painting, he saw the alien painting. He said " Oh, I want one of those" so ended up doing one for him. Then he wanted another one. After that, I thought i would put one on Ebay, it ended up selling in 2 days and got shipped up to Poughkeepsie, New York. It's been a long time since I did one. So, just wanted to give everybody a little history on thses crazy alien paintings lol.


After I got Shelley’s second painting right, I had to focus on the painting for Shelley's mom. Shelley was so nice; she sent some pics of my alien faces paintings to her mom, via email. From my understanding, her mom has a bunch of paintings with all kinds of different faces and really liked my alien faces paintings.
I got started on it about 3 weeks a go, but I noticed after working on it for awhile, it just wasn’t right. So, I sanded it back down and primed it again. It just didn't look right, the sizing was all wrong and it didn't have that "it factor" to it. I'm really happy I bit the bullet and started all over again because it's exactly the way I want it, now. The Alien's are better (3 of them stayed the same) and everything thing looks right for the size of the painting. Here are some pics to show last weeks progress.


This week I framed it and finished everything up. This style of painting never looks good until the very end. So, you have to trust yourself the whole time but because it bascially looks like crap until the end. As an artist, you have to really trust yourself when your doing certain paintings. There's always that second guessing about certains things and you just have to forge ahead even when you don't quite see it at that moment. I really love how this one came out, everytime I show it to somebody, they start laughing which what these paintings are all about. Hell, if you don't chuckle at this painting, I don't what to say. Anyway, I'm so happy I got to do a new alien painting. It was a pain the ass (most paintings are lol) but it was also a huge amount of fun. In the end, I think Shelleys mom (Paula) well enjoy the painting for many, many years to come.


Thank you Paula, I hope you love it as much as I do.

Monday, April 25, 2011

Shelley's 2nd painting

Ok,


I hope everybody had a great holiday weekend.


I got a lot of work done on Shelley's big painting. For her second painting, Shelley really liked a certain style I do, so we decided to do one of those for her. After I primed the canvas, I drew out a bunch of different block shapes. I paint all the different shapes black, gold, red and yellow. I wanted a lot of texture in every block, so I mixed a combination of saw dust, modeling paste and paint and applied a heavy amount inside of each block.
What's nice is, I just got through doing 3 of the same style paintings about a month a go, so I had little practice. I figured out a lot of little tricks to speed things up on those first 3 paintings. The very first one I did, took me forever, the second one, took a little less time, and so on and so on. So, I pretty much knew how to make everything look right without having to go through a bunch of hassle. On Shelley’s first painting, I used a special gold paint, red and yellow. So, I used the same gold paint and other colors on her second painting. I wanted to make sure that both paintings work really well together.

I pretty much have the whole painting done already, but I didn’t take pics of the finished painting yet. I still have to frame it and do a bunch of touch up. I'll post the pics of the finished painting soon.


I forgot my camera at work, so I’ll the pics are from my cell, sorry.


Hello again,

I hope everybody had a great weekend.

So, it's been awhile since my last update, I finding out that it's a lot harder to keep up with this blog, than I thought lol.

Anyway, I wanted to finish the blog for this painting. I finished the painting and brought it to Shelley, she loved it, but after looking at it, she noticed that the red color was a little pinkish. She wanted the red color to match the red in her first painting, plus, she has a few other pieces of art in her house that are what I call...a true red too. When i got the painting home, I could totally see what she was talking about. So, I started redoing the red part, but had to pretty much redo most of the painting. You can't just redo the red part on this type of painting, it's a little harder than that. I brought it back to Shelley after i got everything right. This time, I knew I had the color of red she was looking for, and, of course i was right lol. She saw the new red color and was very happy with the painting. The first pic you see below, is before I repainted it. The second one shows the finished painting with the new red color.


I want to thank Shelley again for letting do these paintings for her. I love how both of them turned out and they were a lot of fun to paint. Thank you Shelly.

Shelley sent me a picture with both of her paintings up. This is what being an artist is all about. How cool is it to see somebody's livingroom with your paitnigs on the wall? Too cool.

The pic was a little out of focus, so I doctored it up a bit, but they still look cool to me.


Tuesday, April 5, 2011

Shelley Paintings

Hi,

I started a new painting Sunday night. I mentioned last week, a friend at work (Shelley) wants me to do 2 paintings for her. I’m very excited to do both, of course, but I’m really looking forward to painting the smaller one. She wants one large painting (50" X 48") for over her couch and one smaller painting (24" X 48") for her fireplace.

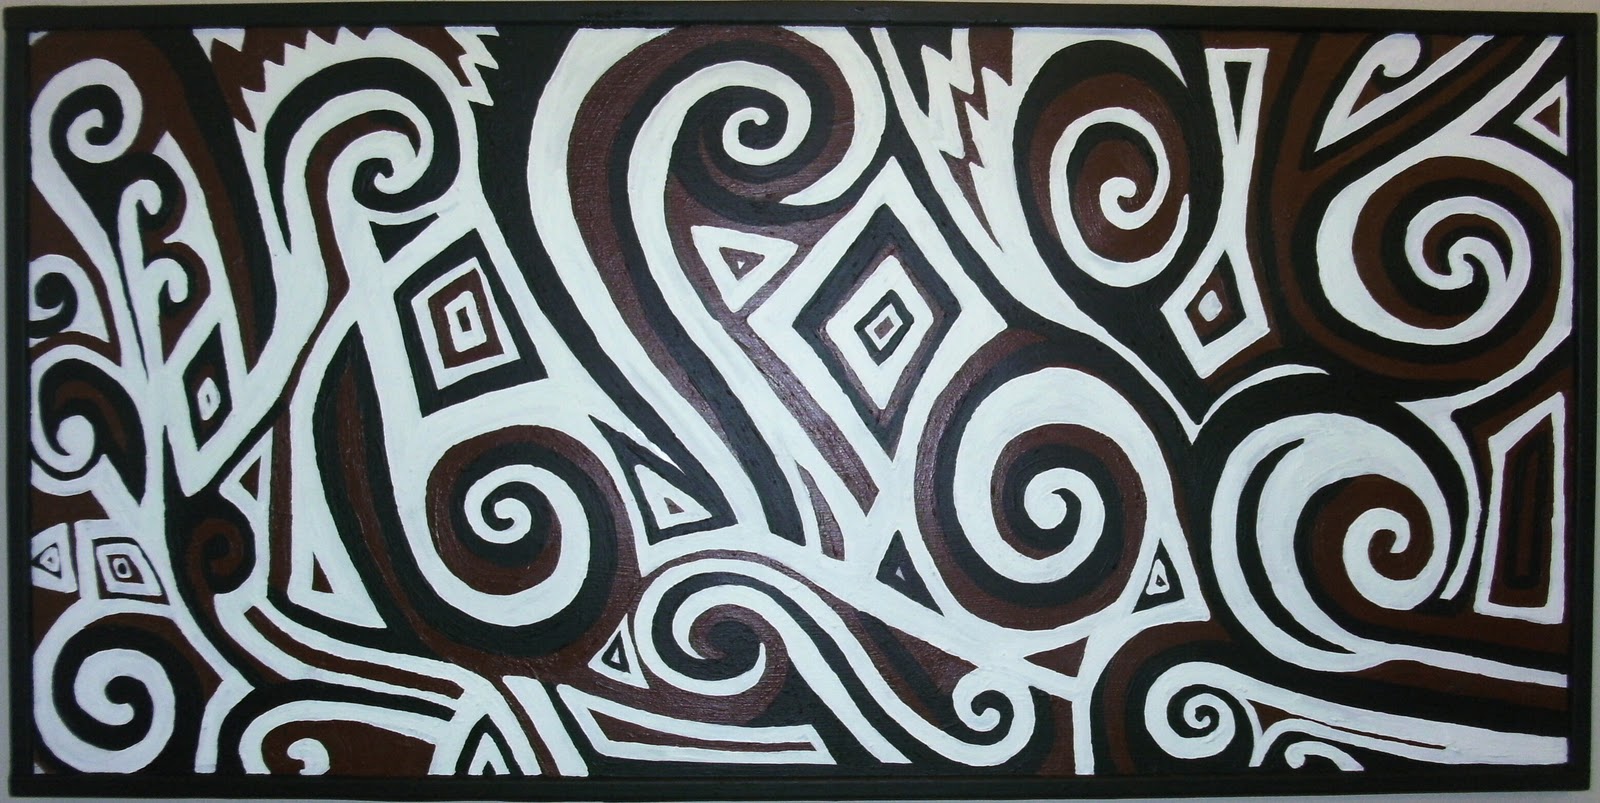
When I first started painting, one of the first real paintings I did, was a cool swirl pattern. I added a couple of pics to show the paintings, I'm talking about. I'm not sure where this swirl thing came from, but it must be from my childhood. The first two swirl paintings I did, I sold on EBay. It’s been a couple of years since I painted a swirl painting, so that’s why I’m really looking forward to doing this painting first. Shelly wants a gold background with a bunch of different color swirls. We’ll talk about the 2nd painting later. After priming the painting, I sat down and did a few drawings, just trying to get a feel for what the painting will look like. I finally decided to go with one of my drawings. I added some pics to show the progress, so far.  


The pics below is Shelleys new painting, well, the start of it.


Seeya,
Clint

Hello,

Ok, I got a lot of work done in the last 2 days, but I don’t think you’ll notice from the pictures.

A couple things…First, I remembered one thing about this type of painting; you have to do what I call, the round and round. What I mean by that is, you fix one thing and that mess’s up the other thing, then you fix that, and you mess up the other parts. So, you have to go round and round until you narrow all the problems down.

Second, the painting was way too slick, smooth or whatever you want to call it. And, it didn’t have much warmth to it, so I added a bunch of thick paint to the swirls, and I started adding some shading to the area’s between the swirls. Basically, I’m kind of messing it all up, but in a good way. I also added a ton of gold paint between the swirls to create some texture.

Third, I did something really stupid at the beginning, instead of drawing the whole swirl; I just did a one line swirl then went back and drew in the rest of the swirls, bad idea. Sad thing is, I know not to do that, but I forgot since I haven’t done one of these in few years. What happens is, you have to block all that stuff out that you don’t like with paint, that’s why I had to paint the yellow swirl, green, then white, and then yellow again, just to get rid of the black lines I didn’t want. I kept thinking if I just add enough yellow, I wouldn’t be able to see the black lines I didn’t want, WRONG. I also added a few different colors to the lower swirls to give it a better look.

More on the shading between the swirls, it doesn't look that good at this point, but after I go back over the shaded areas with the gold paint, it will look better.

One last thing, this type of painting always looks bad until the very end. After I get the swirls shapes, the shading between the swirls and all the different colors just right, then I'll clean everything up with some black out lines around the swirls.

I hoping I get the whole painting part done by Sunday afternoon, so I can frame it Sunday night. Hopefully, the whole painting will be done by Wednesday, so I can start working on the larger painting. 

The pics I'm posting were taking with my cell so there not that great.


Hello,

I got a lot done over the weekend on Shelley's small paintimg. The painting is all framed now, so I'll have to do is get the swirls looking right and I can start on the next painting. Here's a few pics to show the progress. Hopefully, I'll be able to finish it tonight, but I'm not sure.


Hello everybody,

I hope everybody had a great weekend.

Sorry, I didn’t update much last week. But, I got a lot of work done on Shelley’s small, swirl painting.

 I was talking about putting some black, shading in between the swirls last week, but for some reason it just didn’t work on this painting. The shading actually made the painting look a little dirty. I went back over the shaded areas with some gold paint and cleaned it up. What’s weird is, I always do a little shading on my swirl paintings, it adds depth and warmth, but it just didn’t work on this one. I forgot how much work one of these swirl paintings can be, I did the old around and around so many times, it about drove me crazy. One of the things people have gotten use to, is, seeing designs that are generated from the computer. You know, exactly perfect looking lines and thing is just perfect, I hate that crap. No feel, no warmth, no mistakes, that’s not art, that’s just some perfect looking crap created by a computer. One of the things I really like about this painting is how all the different colors work with the gold paint. The yellow, green and red colors work so well with the gold paint. You’ll notice I created a bunch of texture with the gold paint. This brings up another point; I don’t like my paintings to be too smooth. When you see one of my paintings, you know it’s a painting and not some copy of a picture. Basically, I break every rule there is when it comes to painting. I’ve never been to art school, but I’m sure they would tell me stuff like…you’re over painting, you could make it look smoother by applying paint this way or that way, get out of here with that crap. I want to know its painting; I want to see some mistakes, texture and thick paint. I want to feel the painting, I like to put my hands on it and feel all the paint on the canvas. Here’s some pics showing the finished painting.


Ok, on to the next painting. This next one should be fun, will see lol.